Monday 26 June 2017

Lining everything up

Well here it is! I got my tub delivered by Derek Hambly at the beginning of the month, and what a fine job it is too. Made mostly from 20swg Zintec  I reckon it weights in at about 70kg. I specifically asked Derek to leave out any holes so I could put all the access etc where I wanted it, the first job, particularly on a competition car is to get everything lined up and straight through the centerline of the car. 
Firstly, I got myself a laser level from Screwfix to make the job easier, fixing it to a step ladder for height I marked the centerpoints of the subframe fixings and then the centre of the main tub then I lined the laser through, making sure the tub was level on it's pallet with castors base.


After marking the centre lines on the chassis at various points I then bolted in the subframes. Before I bolted them in I had measured the center of  top and bottom arm pivots and marked them with a little hack saw cut on the top of the subframe.


After bolting them all in (I had to jack up the front to meet the floor pan) I Checked with the laser through the chassis centerlines. It is a great indictment of Derek's workmanship that I was 1mm out from front to back! No adjustments needed here, brilliant. Now i drilled all the holes needed, 2 extra into the rear subframe (they can be just seen in the above picture) and 2 into the front where the rear legs meet the floor pan, I also added two 3mm stiffening plates to the front towers.


The next evening session I got, I set about cutting some holes, firstly was the the one for the gearstick, then an access hole to the side for getting to the Mini remote housing. Next came the Handbrake, this is off a MG Midget but I will modify the linkage to except the cables from a Morris Minor at a later date.


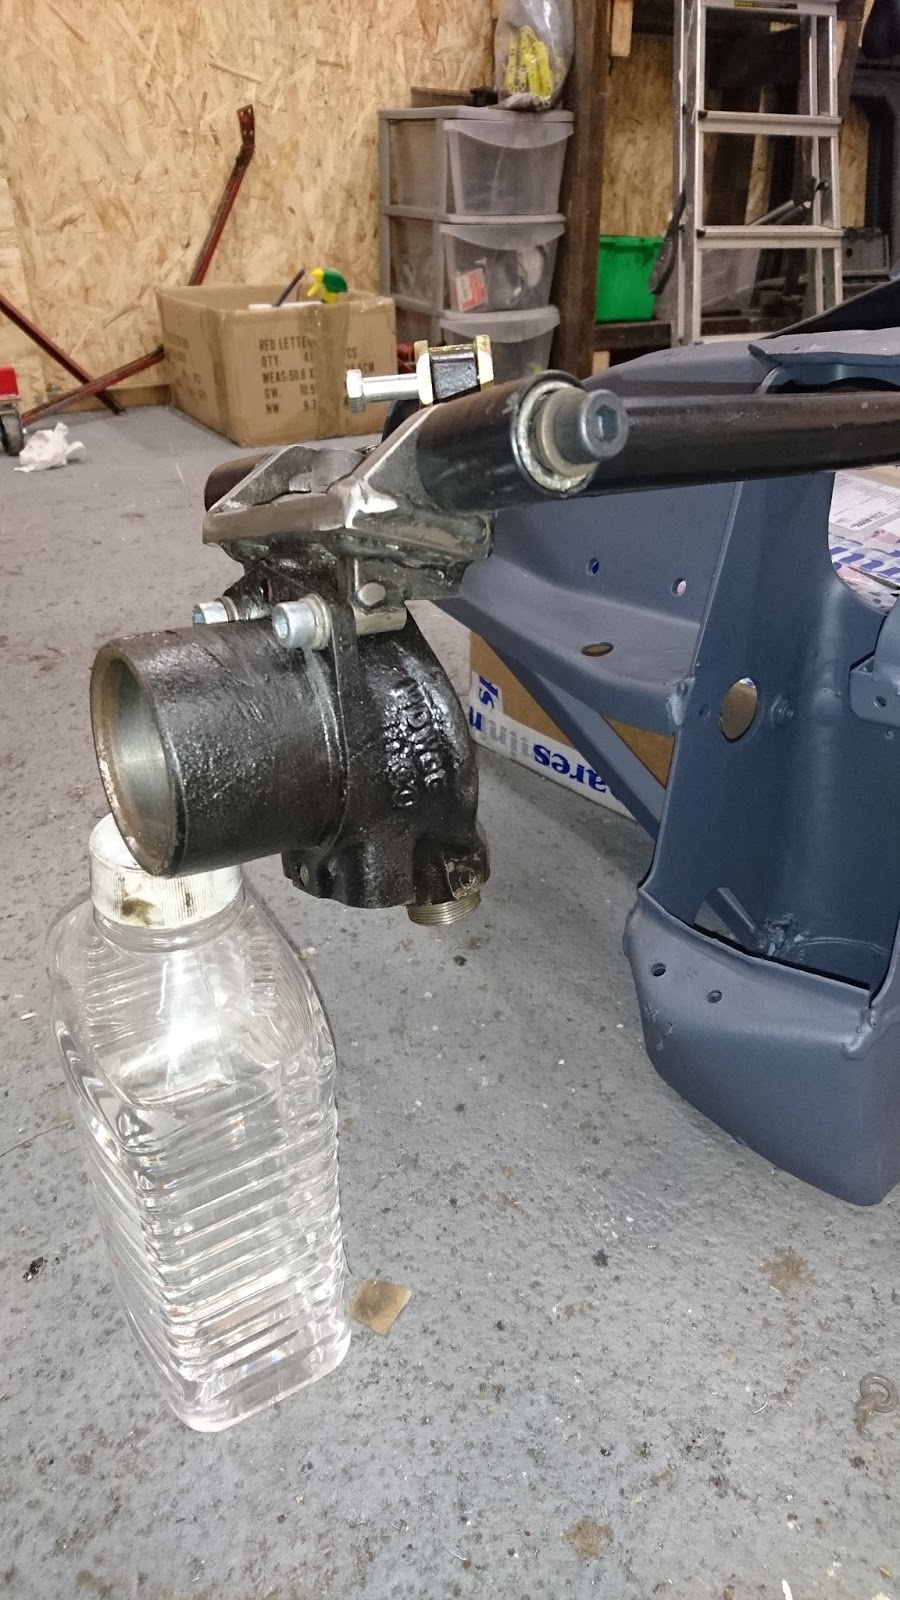
Here is my Steering column bracket, I didn't want to use the Dolimite one that came with the car as it angles across the car, plus in the event of a shunt I have a massive Javelin right in front of my breast bone! I picked up a MGF lower steering column off eBay for a tenner and that fitted beautifully The main column is a  400mm Steering shaft from CBS running on 3/4"Oilite bearings in a 25mm I/D tube, works a treat. I have also fitted a quick release steering boss as I'm not as supple as I used to be!


Next job on the list was to get the front end built up and in, Firstly I bolted up the top arms cones and the adjustable trumpets, then on to the adjustable lower arms, these are the bushed ones rather than rose joints as I don't believe that rose joints and road dirt are a happy mix!
Then the hubs with cut down shafts went in and the Steering rack, positioned as indicated in the GTM build manual, I have some rather lovely rack brackets from Derek in Alloy which look great, pity you can't see them when everything is bolted in! I also cut the holes for the 25mm Aluminium cooling pipes that run through the tunnel.


Sunday 28 May 2017

Filling in the holes

So I started on the rear body section this past week, a previous owner had cut a massive duct into the side of the car to try and cool the rear mounted radiator. Luckily it was constructed out of filler and chicken wire so a bit of work with a jigsaw and a rubber mallet and it was off. After cleaning up the area I screwed/clamped a piece of hardboard with some wax release agent on it over the hole. That meant I could now glass over the hole.

Wednesday 17 May 2017

Getting started on the rear suspension

The original Cox GTM had 2 Mini front subframes bolted into the monocoque, one at the front had standard Mini components but the lower arms were lengthened to allow for the lack of an engine. At the rear the steering arms were locked off with a ball joint attached back to the subframe to stop the hub rotating, this was all very well in theory but in practice the steering arm would bend under load and the car would "rear steer" when you were pressing on in a corner, not very good!
Later when Howard Heerey took over the business he changed to a lower reverse wishbone (below)

The trouble is that the alignment bolts only "bear" on the hub so were prone to working loose and then you get rear steer, also the carrier is not really man enough so would bend.


I did not want this to happen on my racer for obvious reasons! I also wanted to keep the basic design.
what I came up with was a carrier that was thicker (10mm plate instead of 8mm) and that bolted through the 2 holes that hold on the brake back plates, Heerey also offered a fully adjustable racing version of the GTM called the "Club 90" with rose joints everywhere, as this was to be a road car as well I decided to keep the rubber bushes but make the inboard bush adjustable. Hopefully this should stop the rear steer.

                  
The original set up, adopted again later in the 80's                     My solution 

                                              
I have now built up 2 carriers and wishbones and mocked them up on the subframe
I also used the heavy duty tie rods from Minispares, that way I have good adjustment in 2 directions.

Monday 15 May 2017

Why a GTM?

So why a GTM you ask? No? Well I'll tell you anyway.
Firstly, it was cheap! The classic car market is very buoyant so finding a cheap Lotus or something similar is hard. When I started looking at cars I wanted a car that was small, easy to get parts for and unusual. I think the GTM is all of those, being based on a mini, parts are easy to get and not too costly.  It can be made to handle with a bit of fettling of the suspension geometry and location on a mini front subframe is rather good. There are not many early Cox or Heerey GTM's about either, let alone racing, So it is something different.

Introduction


I am starting this blog as for 2 reasons, one is to have a record of what happened but mainly as a source for others that they may find useful.
Firstly a bit about myself. I am a Architectural technician living in London (UK) I started out working on cars with my late Father who was an engineer and garage owner, at the ripe old age of 53 he decided to build himself a race car out of a rusty old 69 Lancia Fulvia that a customer of his had brought in and it failed its MOT. After several months of late nights and lots of welding two things had happened, we had a race car and I had done very badly at school...
That year we raced all over the country and Father did rather well, and the bug bit!
the following season we brought a wreck of a Fairthorpe Electron Minor and proceeded to build that into something better suited to circuit racing, Again after much trial and error we ended up doing rather well and ended up with a FIA GTS car that we took all over Europe in 1989 and had a lot of fun.
By the mid 90's though Dad had run out of time and funds and stopped but I always promised myself I would build myself a race car.
I eventually left school with some rather disappointing results and ended up as a apprentice Welder/Fabricator which I did for 12 years, moving on to design work and then into my current occupation. 
after Dad passed away in 2014 I decided that life is too short and to get one with it and build me that race car!

So it was that I ended up in a Cambridgeshire barn dragging out the remains of a 1971 Heerey GTM 1-3, to give it its full title! Here is a brief history of GTM.
This then went straight into storage in deepest Essex as I had a house to extend/rebuild and no workshop.
1 year later and my house and workshop were ready and home it came, in the meantime I had been in contact with Derek Hambly who was starting up Hambly Sportscars and was offering to make replacement chassis for the GTM, mine was extremely rusty and beyond repair so I jumped at the chance, so while Derek constructs my new tub I have been collecting parts and refurbishing the body.

Lining everything up

Well here it is! I got my tub delivered by Derek Hambly  at the beginning of the month, and what a fine job it is too. Made mostly from 20s...